How to create Angular Material Data Table


In this article, we’ll go over an example of how to use the Angular Material Data Table with sorting, pagination, and filtering in the Angular project.
Getting started with Angular Material
Install angular material in your Angular project by using the following command.
ng add @angular/materialNow, import the material modules in your app.module.ts file
import { BrowserModule } from '@angular/platform-browser';
import { NgModule } from '@angular/core';
import { AppRoutingModule } from './app-routing.module';
import { AppComponent } from './app.component';
import { MatTableModule } from '@angular/material';
import {MatFormFieldModule} from '@angular/material/form-field';
import {MatInputModule} from '@angular/material/input';
import {MatSortModule} from '@angular/material';
import {MatPaginatorModule} from '@angular/material';
import { BrowserAnimationsModule } from '@angular/platform-browser/animations';

@NgModule({
  declarations: [
    AppComponent
  ],
  imports: [
    BrowserModule,
    AppRoutingModule,
    BrowserAnimationsModule,
    MatTableModule,
    MatFormFieldModule,
    MatInputModule,
    MatSortModule,
    MatPaginatorModule,
  ],
  providers: [],
  bootstrap: [AppComponent]
})
export class AppModule { }
Introduction to the Angular Material Data Table
Add this table to your app.component.html file
Passing a data array to the table’s dataSource input is the simplest approach to deliver data to the table. The table will render a row for each object in the data array using the array.
Now, Add mat-header-row and mat-row to the content of your mat-table at last and provide your column list as inputs.
<div class="mat-elevation-z8">
 <mat-table [dataSource]="dataSource" >
  <!-- Position Column -->
  <ng-container matColumnDef="position">
    <mat-header-cell *matHeaderCellDef > No. </mat-header-cell>
    <mat-cell *matCellDef="let element"> {{element.position}} </mat-cell>
  </ng-container>

  <!-- Name Column -->
  <ng-container matColumnDef="name">
    <mat-header-cell *matHeaderCellDef > Name </mat-header-cell>
    <mat-cell *matCellDef="let element"> {{element.name}} </mat-cell>
  </ng-container>

  <!-- Weight Column -->
  <ng-container matColumnDef="weight">
    <mat-header-cell *matHeaderCellDef > Weight </mat-header-cell>
    <mat-cell *matCellDef="let element"> {{element.weight}} </mat-cell>
  </ng-container>

  <!-- Symbol Column -->
  <ng-container matColumnDef="symbol">
    <mat-header-cell *matHeaderCellDef> Symbol </mat-header-cell>
    <mat-cell *matCellDef="let element"> {{element.symbol}} </mat-cell>
  </ng-container>

  <mat-header-row *matHeaderRowDef="displayedColumns"></mat-header-row>
  <mat-row *matRowDef="let row; columns: displayedColumns;"></mat-row>
 </mat-table>
</div>
Add this table data to your app.component.ts file
Create a variable in your component that holds the list of columns you’d like to render.
Make sure to import MatTableDataSource module in your component
import { Component, OnInit} from '@angular/core';
import { MatTableDataSource } from '@angular/material';

const ELEMENT_DATA: any = [
  {position: 1, name: 'Hydrogen', weight: 1.0079, symbol: 'H'},
  {position: 2, name: 'Helium', weight: 4.0026, symbol: 'He'},
  {position: 3, name: 'Lithium', weight: 6.941, symbol: 'Li'},
  {position: 4, name: 'Beryllium', weight: 9.0122, symbol: 'Be'},
  {position: 5, name: 'Boron', weight: 10.811, symbol: 'B'},
  {position: 6, name: 'Carbon', weight: 12.0107, symbol: 'C'}
];

@Component({
  selector: 'app-root',
  templateUrl: './app.component.html',
  styleUrls: ['./app.component.css']
})
export class AppComponent implements OnInit {
  displayedColumns: string[] = ['position', 'name', 'weight', 'symbol'];
  dataSource = new MatTableDataSource(ELEMENT_DATA);

ngOnInit() {}
}
This is the output of the table.

Add Sorting to the table:
Now, add matSort to table and mat-sort-header to mat-header-cell
<mat-table [dataSource]="dataSource" matSort>

  <!-- Name Column -->
  <ng-container matColumnDef="name" >
    <mat-header-cell *matHeaderCellDef mat-sort-header > Name </mat-header-cell>
    <mat-cell *matCellDef="let element"> {{element.name}} </mat-cell>
  </ng-container>
  .....
</mat-table>
Make sure to import MatSort module
import {MatSort} from '@angular/material';
export class AppComponent implements OnInit{
@ViewChild(MatSort ,{static:true}) sort:MatSort;
ngOnInit(){
this.dataSource.sort = this.sort;
}
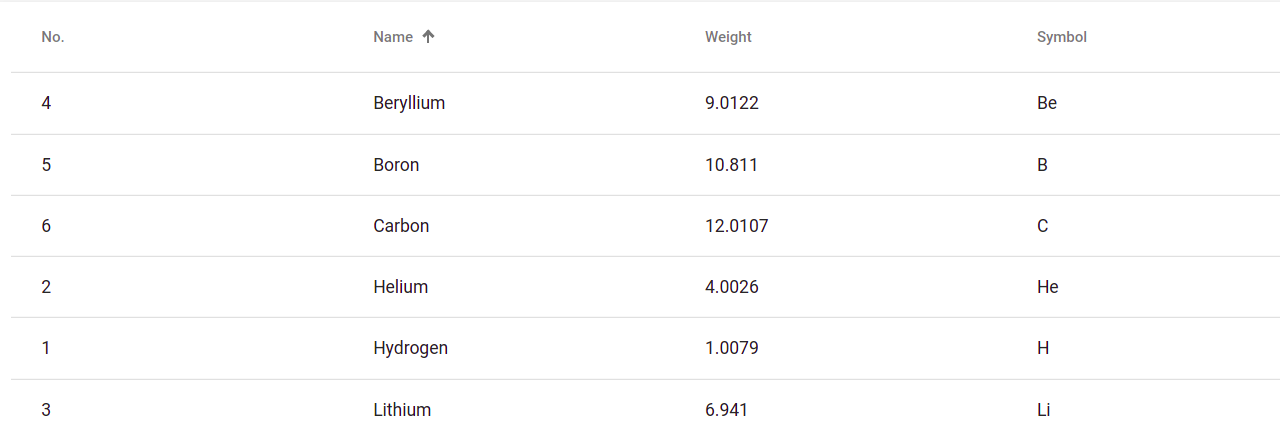
}In this image sorting was done for name column:
Add pagination to the table:
Add this to app.component.html
<mat-table [dataSource]="dataSource">
....
</mat-table>
<mat-paginator [pageSizeOptions]="[2, 4, 6]" showFirstLastButtons></mat-paginator>
app.component.ts
import { MatPaginator} from '@angular/material';
export class AppComponent implements OnInit{
@ViewChild(MatPaginator, {static:true}) paginator: MatPaginator;
ngOnInit(){
this.dataSource.paginator = this.paginator;
}
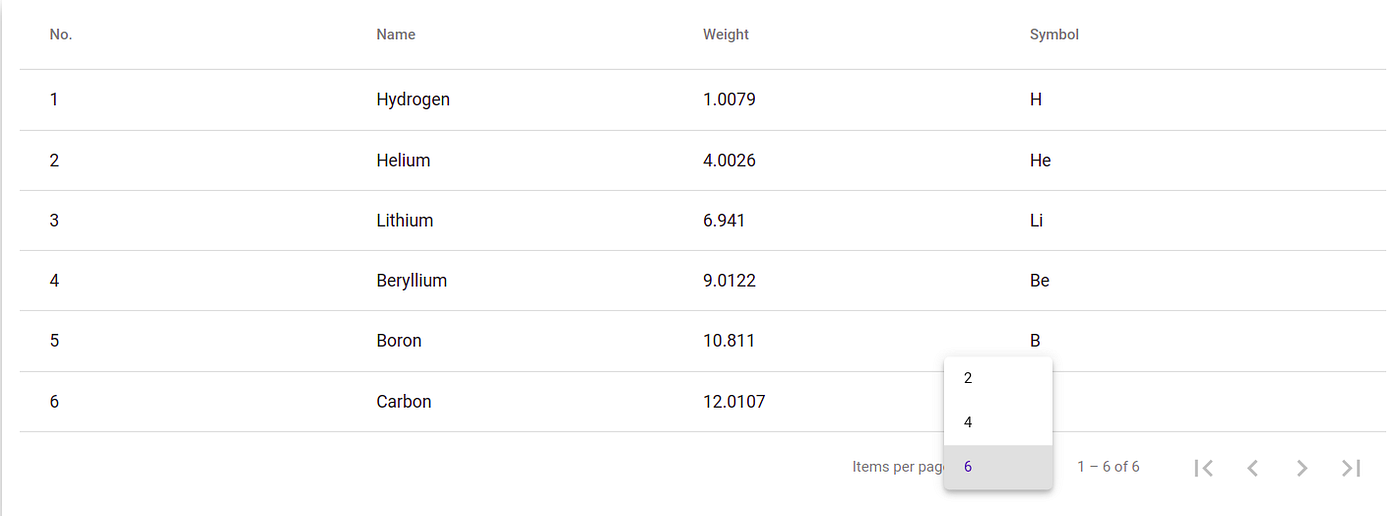
}This is the output for pagination
Add Filtering to the table:
Add this method to your component
import { Component, OnInit} from '@angular/core';
import { MatTableDataSource } from '@angular/material';

@Component({
  selector: 'app-root',
  templateUrl: './app.component.html',
  styleUrls: ['./app.component.css']
})
export class AppComponent implements OnInit {
  dataSource = new MatTableDataSource(ELEMENT_DATA);

   applyFilter(filterValue: string){
   this.dataSource.filter = filterValue.trim().toLowerCase();
   }
}
Now call the method in app.component.html
<mat-form-field>
<input (keyup)="applyFilter($event.target.value)" matInput placeholder="Filter">
</mat-form-field>
<mat-table [dataSource]="dataSource">
....
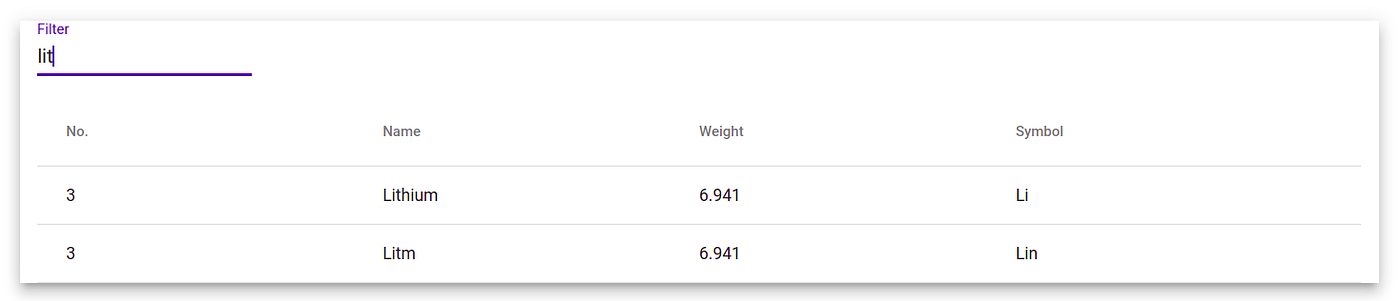
</mat-table>The image shows results for filtering
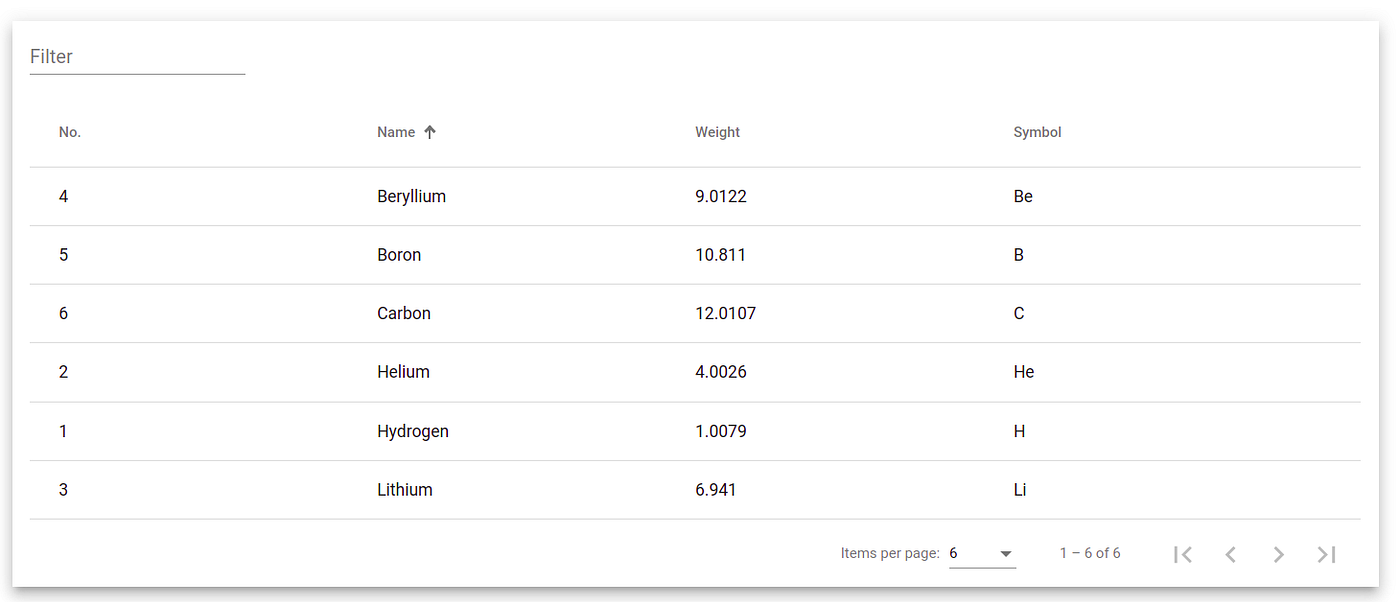
The below image was the overall output of the Angular material data table with sorting, filtering, and pagination.
This is how we can install and create an angular material data table in the Angular project.
To secure your Organization's data, Check outgetsecured.ai helps your data to protect from cyber threats.
Bhargavi
Bhargavi is working as a frontend developer and ui/ux designer. She works on building the best user experience and end-to-end technical deliverables from feature creation. You can reach out to her by Clicking Here.